Sometimes you may need to collect visitor data that goes beyond the payment data.
For example you might want to request their company, age group, interests or even a photo. You can do that with Oveit‘s registration forms.
Here’s how you can set up a registration form:
Step 1. Activate the registration forms
When you are setting up a new event, you will see an “Enable custom registration forms” checkbox on the first step. Activate it to see the registration forms setup.
Step 2. Set up your custom registration forms
Now that your registration forms feature is active, you are ready to set up your custom forms. Here’s a preview of a form:
The form setup is pretty easy to use. Click the “+” icon to add a new field. Choose the Field type and add a label that shows your visitors what you want them to fill in that field. Check the “Yes” (Mandatory) checkbox to make it mandatory field. If you want to delete the field you can click the “x” icon on the right hand area.
You can choose from multiple form types:
Text field (one line text input)
Multi-line text field (a text area)
Email address (the input checks for email formats)
Date (Day/Month/Year field)
Dropdown list (single or multiple option dropdowns)
File upload (upload .doc, .pdf or image files)
After your form is ready, just click save or next to finish and publish your event.
Step 3. Publish your event and allow visitors to register
After you have published your event, the visitors will fill in the registration form after their payment details. Here is a preview from the registration page:
Once they fill in their details you will see them in your dashboard, under your event. You can see your visitor data in the “Check in” section and you can download the data from the “Attendees” section:
If you click the “Check in” link you can view a list of your visitors and edit their details:
If you click the “Attendees” link you can filter and download a list of your users, which can be used as database for visitors in third party apps (ex. Email Marketing apps).
Let’s say one of your buyers wants their money back and your refund policy allows this. How can you do that with Oveit?
It’s very simple: You have to refund payments from your payment processor (PayPal or Stripe) and afterwards press Reverse/Credit button in your customer’s order.
Let’s have a look at these steps:
Step 1: Issue a refund from your payment processor
Depending on the payment processor you have chosen (Billing > Payment methods) you can either go to your PayPal or Stripe Dashboard and search for the order you want to refund.
Once you find them, there is usually a “Refund” button you can use to send the funds back. Have a look at PayPal’s refund button, for example:
Click that button and the funds are sent back to your customer.
Step 2: Reverse transaction in Oveit and cancel order.
To finalize the refund process you have to search for the order in your Oveit orders page (Reports > Order History) and refund the credit by pressing the “Reverse / Credit” button and afterwards the “Cancel Order” button:
Click the “reverse/credit” button to mark the payment as refunded. Click the “Cancel order” button to cancel the order, cancel invoice and tickets and remove ticket sales from sales reports.
Sometimes you want your tickets grouped together. Maybe you have too many options, many you want to set up time slots or maybe you want to group them by different categories.
Oveit can help you do that with ease, in the tickets setup page.
Here’s how you can group event or venue tickets:
Step 1: Go to your Oveit account (or register for a new account) and start a new event (My Events > New Event)
Step 2: Set up your tickets under the “Ticket categories” section
The first thing you will see is the new ticket setup form:
After you fill in the data on your first ticket category and click “Save ticket category” you are taken to the ticket category page:
Let’s go ahead and create 3 more new tickets, which we can later on group under two different ticket groups. Do that by clicking “New ticket category“.
Great – we now have 4 tickets which we will group under two groups:
Step 3: Set up your ticket groups
Click inside the “Create group…” input and add your first group name. Let’s name it “Group one”. Click “Add group” button to save it. Do that again and create a second group called “Group two”.
Great, now we have two ticket groups, which you can see show up under the ticket names:
Now click and drag the three-line icon next to “My first ticket”, under the “Group one” group. Make sure it is slightly indented so it shows under the “Group one” section:
Now drag and drop “My second ticket” under “Group one”. Drag and drop “My third ticket” and “My fourth ticket” under “Group two”:
You should see the tickets aligned as seen above. If you now click “Next step” below, changes are saved and you are taken to the next event setup step.
At the end of your event setup you will see your tickets grouped together as seen below. Clicking the “+” icon will open the ticket purchase options:
Tickets are now grouped. Using the “+” and “-” icons visitors can expand or close the ticket groups.
Bitcoin has been on the rise in the previous years and it is quite a hot topic right now. The market cap at the time of us writing this post is $249 billion, so quite a lot of money. Event planners can benefit from selling tickets to those that hold bitcoin assets right now.
Why should I accept Bitcoin for ticket payments?
The main reason to accept bitcoin payments is the fact that there is a lot of wealth stored in Bitcoin right now and not many event planners accept bitcoin payments. This way you can attract a very interesting (and large) market share. Plus, it’s easy to do and you can use Bitcoin payments as an alternative to bank or card payments.
What do I do with the Bitcoins I receive?
The great thing about using Oveit to handle your event registrations is that you get paid in fiat currency (conventional currency), not bitcoins, so you don’t have to do anything. By partnering with Stripe, Oveit can allow you to accept bitcoin payments for your ticket sales.
How do I set up Bitcoin ticket sales?
Let’s guide you through the simple steps of setting up an account on Oveit, setting up your Stripe account for Bitcoin payments and starting selling tickets.
Step 1: Set up your Oveit account
Go to Oveit Registration and input your email and a password. Your account will automatically be registered and you will be taken to your account:
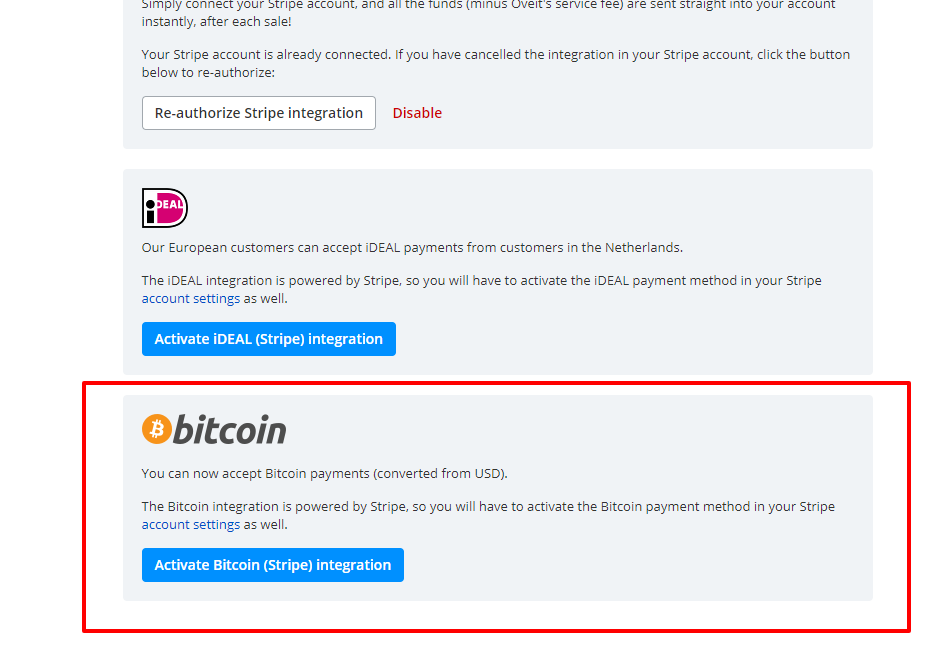
Step 2: Set up Stripe Bitcoin as your payment processor
Click the second link in the welcome page (“Setup payment processor“) to go to your payment processor registration. Alternatively click Billing > Payment methods in the top link bar.
There you can scroll down to where you will see the Bitcoin logo:
Click the “Activate Bitcoin (Stripe) integration” link. You will be taken to Stripe, where you can configure your Stripe account to receive Bitcoin payments in USD.
Step 3: Set up your event and ticket prices
The next step is to set up your event (click here for an event setup guide ) and start receiving payments in USD. At the moment you can only accept Bitcoin payments converted to USD.
Please let us know if there is anything we can do to help you set up your event and start accepting Bitcoin payments.
Sometimes you will need to follow up with a visitor from your past events. You know their name, maybe their email address or some other detail. However, you do not know which was the event they have visited and how to find more details from them.
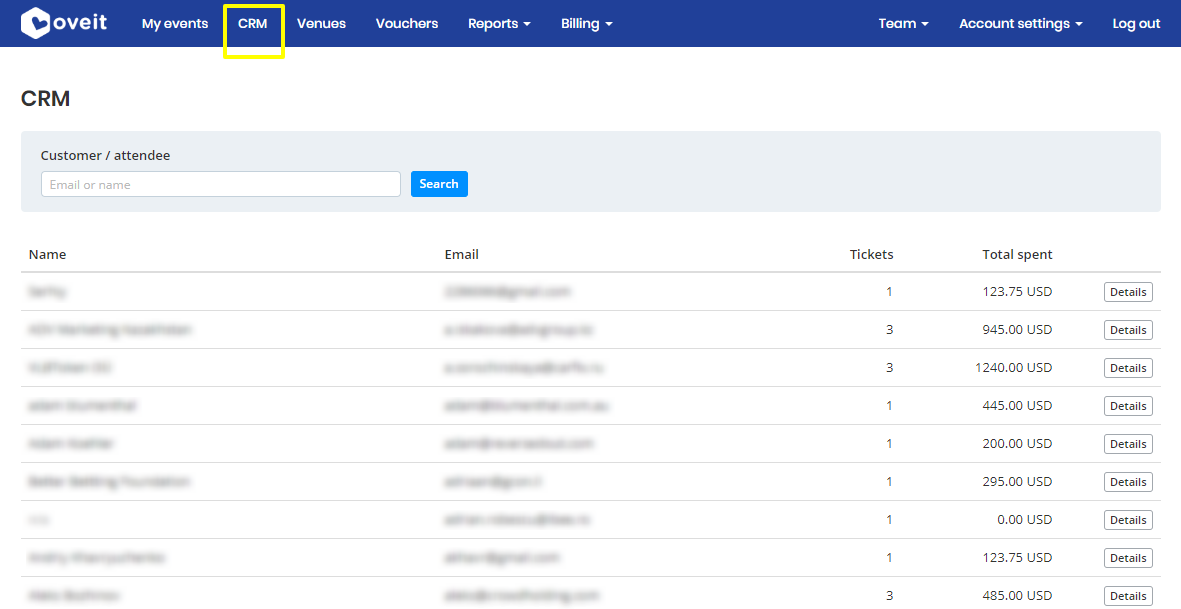
Fortunately, Oveit gathers these details and displays them in your events CRM:
If you click the CRM link in your toolbar you will get to a section where your attendees are displayed, as well as the total number of tickets they have purchased and the total spent.
You can use the Customer / attendee search field to search for someone in particular.
For example you can see what happens if I search for “Adam”:
You can see I get multiple results, from which I can choose. The search also looks for data filled in in your event forms and if it finds something – you will see it.
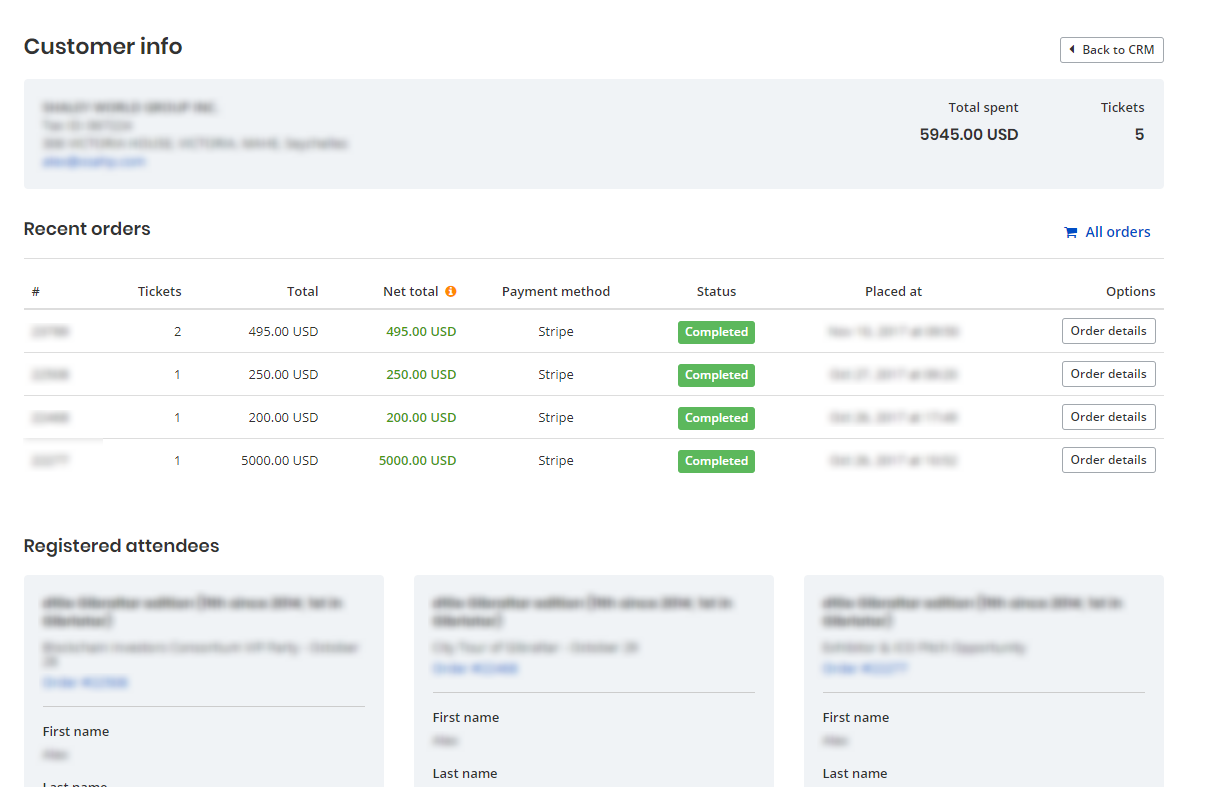
To see more about a particular customer, just click “Details” and you will see a detailed report on this attendee’s activity, including the company or individual details, list of purchased tickets, as well as event participation data (orders, form details):
Are you looking for a tutorial on how to set up ticketing for a museum? Great, you are in the right place.
It will take you less than 30 minutes to start online ticketing for your museum. To do that, you will be using Oveit, our ticketing app. In the end you will have an online ticketing system that will allow your museum to sell tickets online. Here is how the ticketing widget will work (a fully functional example):
Let’s get started:
1. Setting up your account
To start your account go to the registration page. Setting up your account is free and you won’t be charged unless you sell tickets, in which case you will be charged a small ticketing fee.
I suggest you use one of your museum’s email addresses (such as office@mymuseum.com or ticketing@mymuseum.com ) but you can just click on the social login links and use Facebook, Google or LinkedIn accounts for to start your account:
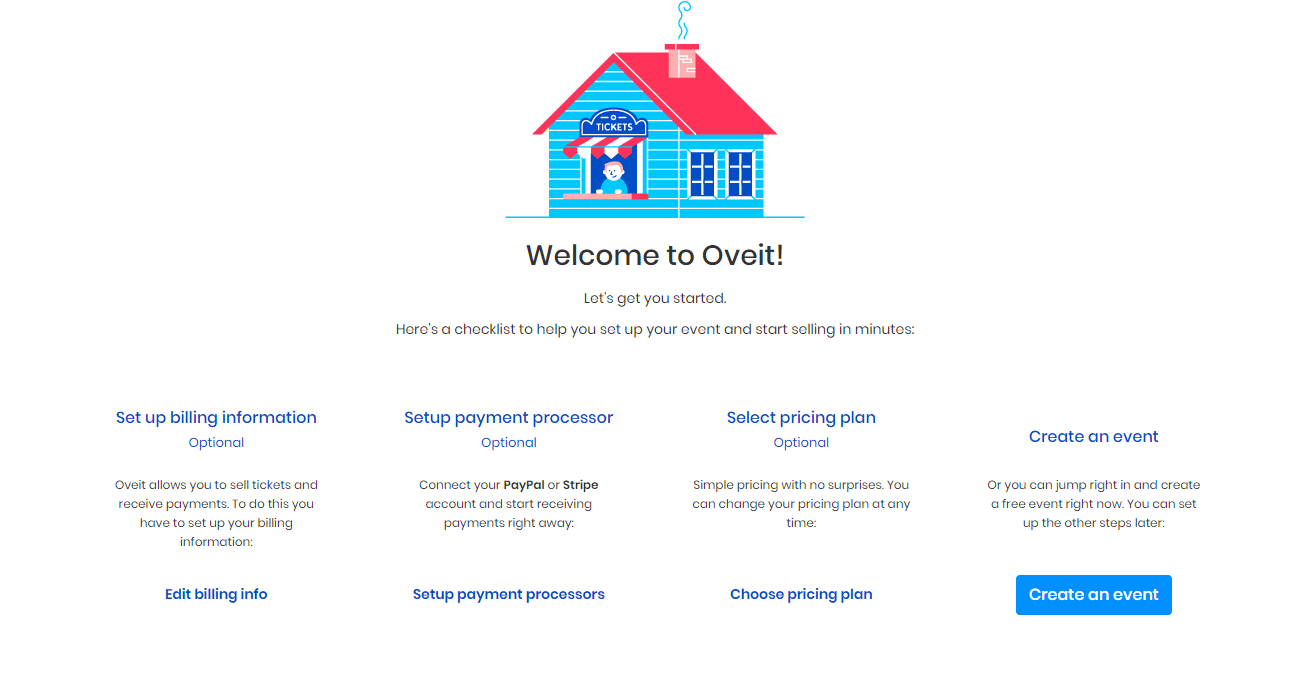
Done that? Great! Let’s head over to the dashboard, where you have some indication of what the next steps would be:
There are basically 4 things you need to do before you start selling tickets to your museums:
Setting up billing information: this is where you input your organization’s billing information, so your customers know where they are buying their tickets from. The billing information is also used for invoices automatically issued by Oveit on your behalf.
Setting up a payment processor: one great thing about Oveit is that you will receive your payments instantly. To do that, you will need to set up a payment processor. Off the shelf we support Stripe, iDeal and PayPal, which both cover a large portion of the world in terms of payment processing. If you have such an account, just click the button to connect your payment processor. However, if your museum needs a specific local integration or you need help with this step, do contact us.
Selecting pricing plan: this is where you choose the right features for you. We suggest you go with the standard plan, which already supports everything you need to sell tickets to your museum. Plus it’s the most cost-effective one.
Creating a ticket sales event: last but most important – this is where set up everything related to ticket sales for your museum. The process is fairly simple. Define an event (access to the museum), set up ticket options, set up the follow up email for your visitors and preview the sales widget. Afterwards, just copy and paste the embed code in your website’s CMS (content management website).
2. Setting up the museum’s online ticketing
Great, you have an account and you are ready to set up ticketing for your Museum. Create a new event (we will refer to the museum access as a perpetual event) by going to “My Events” and clicking the “New Event” button on the right hand area:
The setup process is fairly simple and consists of 4 steps (5 if you want to collect visitor data such as name, email or other relevant information):
2.1 General settings for your online ticketing
Step one consists of general information. As you can see above I’ve added the “My Museum Online Ticketing” for the event name but you can add whatever you find relevant. Some example might be your museum name, “online ticketing” or maybe “Buy tickets to the museum”. The name will show up on top area of the ticketing widget. Optionally you can add a description to give your visitors some insights on either the museum or the ticket buying process.
Leave the “No seating” option checked and add your address in the “Location/address” field. You can also add a Google map to the ticketing widget by clicking the “Place on map” link.
For the “Starts at” field just check the “Perpetual” checkbox, given that there is no start/end date to your museum being open.
If you want to collect data on your visitors check the “Enable custom registration forms” checkbox. This way you can set up a form your visitors can fill in when they buy museum tickets. This is an optional step but I have included it in this tutorial so you can use it if you find it necessary.
Finally click “Next step” to save your progress and move to the next section:
2.2 Museum ticket categories
The ticket categories section is where you set up your museum ticket options. I will assume you will be selling two types of tickets (adults and children).
Let’s see how you can do that. Once you click the “Next step” button on the previous section you will be taken directly to the section where you can add your first ticket.
Here’s a preview:
The first part is where you input a ticket type name (I have added “Adult”). You can also add a description that will show under the ticket name.
Next you have the “Ticket price” section: You can add tickets in over 15 currencies. I’ve chosen USD for this example, and entered 15 as the ticket price. The ticket fee is added on top of your ticket cost by default but you can choose to include it in your final price. To do that, just check “Include the sales fees …” box.
You also have a “Bulk sales options” area, where you can input bulk prices. For example an adult ticket might cost $15 but people usually visit museums in pairs so you can add an incentive for them to buy two tickets. To do that just enter the number 2 (2 tickets) and right next to it, after the “tickets cost” section, enter 25. Click the “Add” button on the right. You have just created an incentive for people to buy 2 tickets and save $5.
Let’s scroll over to the next options for your ticket:
The Sales starts / ends section is optional and you can use it to limit the time tickets are being sold. If you don’t choose anything, the tickets will sell perpetually.
You can use the “total available tickets” option to limit the number of tickets that are available for this particular ticket. Additionally you can use the “maximum per order” option to limit how many tickets are being sold on each order. By default it is limited to 15.
Last, one very important option is the perks, benefits and addons feature. This is where you can add some extra perks for your visitors. For example I have added an Audio guide and a Coffee perk for all the adult visitors. As you can see, the Audio Guide is not included in the ticket price, but visitors can purchase it in advance and save time while there. This information is simply stored inside the electronic ticket and visitors are enabled to claim stored items in a matter of seconds.
Finally, click “Save category” to save this ticket category and get back to the tickets section and add one more ticket type.
Here is your tickets list. Click the “New ticket category” button to add a new ticket type for children.
Once you click the “New ticket category” you are taken to the ticket adding page where you can add a new ticket type, “Children”. I have followed the steps described above for the children ticket, with different settings and now my ticket list looks like this. I have used the “Add description” field to add a short description for the ticket types, briefly describing the conditions under which a children ticket can be used:
Tickets can be re-arranged by dragging and dropping the tickets in the intended position. Click, hold and drag the three lines icon on the left of the ticket names.
2.3 Checkout settings for museum tickets
The third step, checkout settings, is the place where you customize the way your museum visitors will interact with your online ticketing system. It’s where you set up the follow up email, how the prices are displayed and which is the message they will see when they finish shopping for tickets.
Let’s start from the top. The first thing you will see are the Tickets settings. Feel free to skip this section if you do not want to go too deep into setting specific aspects. Here’s what this options do:
attach the tickets to the order confirmation email: active by default, this is the option that will attach tickets to the follow up email museum visitors receive. If you choose to deactivate this setting, they can only download the tickets once the payment is confirmed, on the final step of the museum online tickets purchase process.
display the tickets in the order confirmation page: this setting will display the tickets in the final page of the checkout process. If you disable this option and the previous your customers will not receive their online tickets so be careful not to deactivate them both.
display the number of available tickets for this event: this will display the number of tickets still available for the event. If you have a limited number of tickets you want to sell for a specific ticket and want to keep people guessing on how many tickets are still available, uncheck this box and the number will be hidden.
Pricing settings is where you show our (Oveit’s) fee in the ticketing widget. Leave it unchecked if you want your visitor to see a clear distinction between the ticket price and ticketing fee we are charging.
The order confirmation email is where you customize the way the follow up email looks and feels. When people buy museum tickets from your website they will receive an email containing their ticket and some instructions on how to use the tickets by default. You can change this email and customize it to fit your museum’s communication standards.
Here are some variables you can use to input relevant data in the email (just copy and paste them as they are shown above – including the brackets):
[order_ref] – the order identification number. It’s a good idea to leave this in, in case you need to identify a certain order (you can search for it under Reports > Order history)
[tickets_link] – the link where customers can download the tickets from. We strongly recommend you add this into your follow up email
[tickets_help] – a short text explaining how tickets can be used
The order confirmation section:
The order confirmation page can either be a the final step in the customer’s journey or a custom URL (link). In the first case you have customers seeing your confirmation text, as well as the tickets download link. In the second case visitors are being redirected to a custom URL (which you can use for conversion tracking). In this case they can only receive their tickets in the follow-up email.
And that’s it. Click “Next step” to save and move to the next (optional section) – registration forms.
2.4 Registration forms
The registration forms are used if you need to collect data from your visitors. They are optional and some data is needed by default (name, address, email – for ticket purchase to be made). However, you can use this data for:
Statistics on your visitors or
To personalize your museum visitor’s journey through your museum. We provide a rest API which can be used for personalized visits through the museum, if you want to build such experiences.
Here’s an example form:
You can choose from multiple field types (text, date, email etc.). Validation is automatically done by Oveit. All you’ll have to do is just add the right fields and the label. Ticking the “mandatory/yes” checkbox will make sure that museum visitors can’t finish the ticket purchase process without filling that particular input. Fields can be added by clicking the “+” icon and reordered by dragging and dropping the three lines icon.
And that’s it. Your museum online ticketing widget is ready to preview and embed in your website. Click “Next step” to preview and publish your online ticketing widget.
3. Preview, publish and embed on your website
The last thing you need to do to have a completely functional online ticketing system for your museum is to review the ticketing widget and publish your museum sales event. This is done in the last step:
As you will notice you have the ticketing widget on the right hand area. On the left hand area you have a theme customization section, which you can use to customize the look and feel so it fits your museum’s brand.
As an example I will play around with the colors and fonts, so you get a better understanding on how that would work and how you can use it.
By changing the colors and fonts I’ve managed to change the previous theme into this one:
Great! We now have a wonderful, customized and mobile responsive ticketing system that we can use directly on our museum’s website. And did I mention it is available in 5 languages (English, German, Spanish, Nederlands and French)? Now you can expect visitors from all over the world.
One more thing. How do we post it on our website?
To post the widget in your online ticketing section, click the “Publish event” button and you will see an embed code which you can copy and paste in your CMS (as an html code):
In fact – the widget you saw at the begging of this tutorial is actually this exact code, with some minor adjustments, which allow you to test the process with a free ticket.
Are we done? Not quite. How about what happens at the entrance?
4. Scanning tickets at the entrance
To scan tickets at the entrance you can use our iOS or Android apps. Just download them and enter your access credentials (email and password).
Once you open the scan button, access to your camera is requested (we use the camera’s optical recognition to read and scan QR codes). Once you point the camera to the ticket’s QR code, the museum visitor’s ticket authenticity is confirmed and any additional perk is displayed:
And that’s it. You are now ready to sell tickets online, directly on your website, send visitors their digital tickets, prepack perks and scan ticket at the entrance. One more thing – if you get stuck on any of these steps – don’t forget to contact us. We would love to get in touch.