Boost Event Sales: How to Set Up Bulk Ticket Discounts on Oveit

Are you looking to incentivize group attendance at your event? Oveit’s bulk ticket sales feature lets you offer discounted prices for attendees who purchase multiple tickets together. Here’s a quick guide to get started:

Set Your Base Price

Begin by establishing the standard price per ticket for your event category (e.g. one ticket costs $100)

screenshot-2024-04-12-at-12-12-04


Create Bulk Tiers

Define specific quantities of tickets (e.g., 3 tickets, 5 tickets) that trigger a discounted price per ticket (e.g., 3 tickets cost $270, 5 tickets cost $400). You can create multiple rules for each ticket category, encouraging people to place larger orders.

screenshot-2024-04-12-at-12-12-51


Automatic Savings

Oveit automatically calculates the discounted price based on the number of tickets in the order,  informing potential customers how much they can save when placing bigger orders.

screenshot-2024-04-12-at-12-13-38

Once one threshold is reached, it will automatically inform the customer about the next one.

screenshot-2024-04-12-at-12-14-00

Encourage group registrations and boost your event sales with Oveit’s bulk ticket discounts!


How to Use a Discount Code

Placing an order on Oveit? Here’s a quick guide on using your discount code


First, select the ticket(s) you plan to buy. The first screen will display all the available ticket categories; once you have selected the tickets, hit “Reserve tickets“.

screenshot-2024-04-10-at-13-08-50


Within the next screen, you can redeem your discount code and benefit from the discount offered by the event organizer. Enter the code and hit “Apply“.

discount-code-field


After the discount code is applied, continue the registration process to receive your tickets.

screenshot-2024-04-10-at-13-09-40


Congratulations! You’ve just redeemed your discount code on Oveit.


Tracking your event tickets sales

For event planners, the work starts months before the event takes place and finishes long after the last attendee has left the premises. There are multiple aspects that you need to take into consideration, an event ticket sale is one of them.

If you want to understand better where your event ticket sales come from, there are two ways to collect this information.

1. Redirect customers to a designated “Thank You” page

thank-you-page

Our registration software allows you to customize the customer journey, having the option to redirect customers on a designated thank you page each time a ticket sale has been successfully processed.

You can set up a custom Thank You page for each of your events. This option is available in Step 3 – Checkout Settings, where you can opt between keeping the default confirmation page or inputting a custom URL.

This option allows you to track the source of your event ticket sales based on the users that landed on this page. Furthermore, you can create separate audiences and create remarketing campaigns for online users that landed on the ticketing page but haven’t loaded the “Thank You” page.


2. Integrating Google Tag Manager 


gtm-blog

If you want to dig deeper into your event ticket sales, you can rely on our GTM integration. This way, Oveit connects with your GTM account and sends useful information from different steps of the registration process. Events are set up according to GA4 eCommerce Measurement and track the purchase in 4 different steps, using data_layers to track what happens within the process, starting from the form embedded on your website.

The data layers are structured as follows:

– view_items_list (on the embed page)

– add_to_cart (tickets that were selected)

– begin_checkout (before clients are redirected to the payment processing page)

– purchases (data layer extracted from the confirmation page)

This integration allows you to collect data at different points and understand where/if your customers drop off once the process started.

Our efforts focus on delivering the event ticketing software that helps you before, during, and after your event. If you have any questions on how to use Oveit and better track your event ticket sales contact us directly and we will gladly help you set up everything you need.

How to claim your NFT ticket using the MetaMask mobile App

Hello,

Are you planning on buying an NFT ticket for one of the upcoming events? This short tutorial is going to walk you through the process of minting it to your MetaMask mobile wallet.

We’ve put our effort into making selling and buying NFT tickets for events as simple as possible. Here is what you should know.

  1. Select the ‘Claim NFT‘/’Reserve tickets‘ button to begin the minting process. For free NFT tickets, input your email address and if required, complete the registration form. For paid NFT tickets, you’ll need to provide your Billing information either as an Individual or as a Company.

claim-nft

2. Once the order is confirmed, you’ll get redirected to our Thank you page which includes all the required details to import your NFT into the MetaMask mobile wallet. To claim it, scan the QR code which is located in the upper right corner of the confirmation page with your MetaMask mobile App.

qr-order-confirmation-page


3. In your MetaMask mobile App, select the NFTs tab to Turn on NFT detection in Settings. For that, first, you have to tick the ‘Enable OpenSea API’ for the ‘Autodetect NFTs’ option to become active.

turn-on-nft-detection-in-settings-3

4. Next, scan the QR code from the upper right corner of the confirmation page with your MetaMask mobile App.

scan-the-qr-code-4

5. Once scanned, select the ‘Connect Wallet’ option followed by ‘Connect MetaMask’. Next, select the ‘Tap to add Polygon network’ option (if you don’t have it already). Next, select the ‘Mint NFT to wallet’ option, and once minted, you’ll receive a confirmation email from us with the subject line ‘Yay, your NFT is minted!’.

connect-wallet-option-5

6. Once you receive an email with the subject line ‘Yay, your NFT is minted!’, copy/paste the details from the below screenshot in your MetaMask App to import it.


7. Go back to the MetaMask App and select the Import NFTs option. Next, copy/paste the Smart contract address in the ‘Address’ field and the Token ID no. in the ID field. Select ‘Import’ and your NFT will be displayed under the NFTs tab in your MetaMask mobile App.

import-nfts-option-7Video tutorial – claiming your NFT ticket using the MetaMask mobile App

Need further assistance? Contact us.

How to sell tickets for crypto

crypto

Do you want to sell event tickets for crypto? You came to the right place. With Oveit, you can easily set up an event and allow your customers to buy tickets using cryptocurrencies. We’ve partnered up with the leading payment processors (for both fiat and cryptocurrencies) to allow our partners to safely sell tickets. All account plans come with a direct debit option, meaning the money will go straight into your account each time an order is placed. 


To sell tickets for crypto, you just need to:

  • Create an account with Oveit.com
  • Connect your Merchant Account
  • Set up an event, sell tickets, and receive funds instantly


Why sell tickets for crypto

There are more than 300 million crypto users worldwide, and the total available cryptocurrencies sum more than $1.8 trillion (Feb 2022). 

And the numbers are just growing as there are more than 18.000 companies (2021) that accept crypto payments for the products and services. People are starting to use cryptocurrencies in their daily activities, and allowing them to buy tickets for crypto will only help you reach a broader audience. 

As we can see, cryptocurrencies hold great purchasing power. And part of this power is distributed among your audience.


How to sell tickets for crypto

Selling tickets for crypto is easy. We’ve partnered up with Crypto.com, allowing you to easily accept cryptocurrency for your event tickets. You just need to connect your Crypto.com Merchant Account to your Oveit account (option available under Billing/Payment methods) and you are ready to receive crypto from your future attendees.

crypto-com-pay


Setting up an event

Once you set up your account, you just need to set up the event and start selling tickets for crypto. We have prepared a complete guide that will show you everything there is to know about setting up your event on Oveit. But feel free to contact us directly if you need guidance. 

Getting started with Streams.live

Streams.live was developed for content creators that want to share their work over the internet. Virtual events organizers, webinar creators, (online) yoga instructors and more can benefit from a powerful tool that allows them to easily share their work with followers from all over the world.

How does the platform work?Streams.live is natively interconnected with Oveit. This integration allows you to sell access to your live or prerecorded content, without the need of a complicated set-up. 

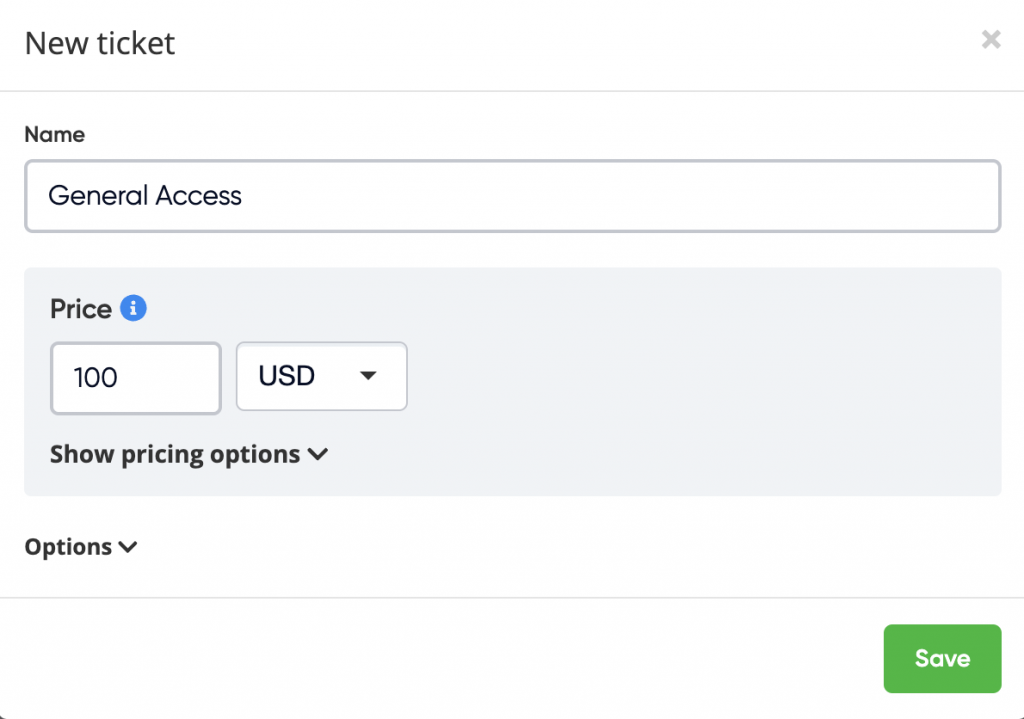
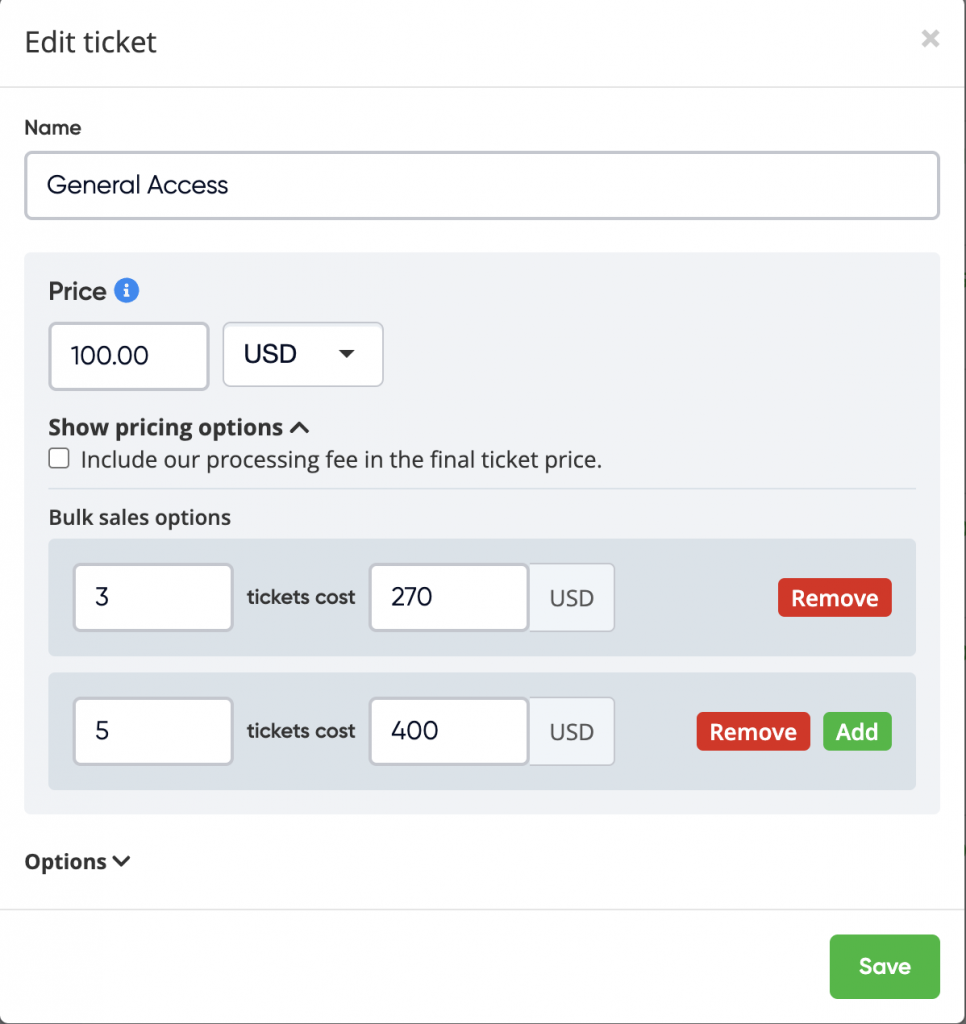
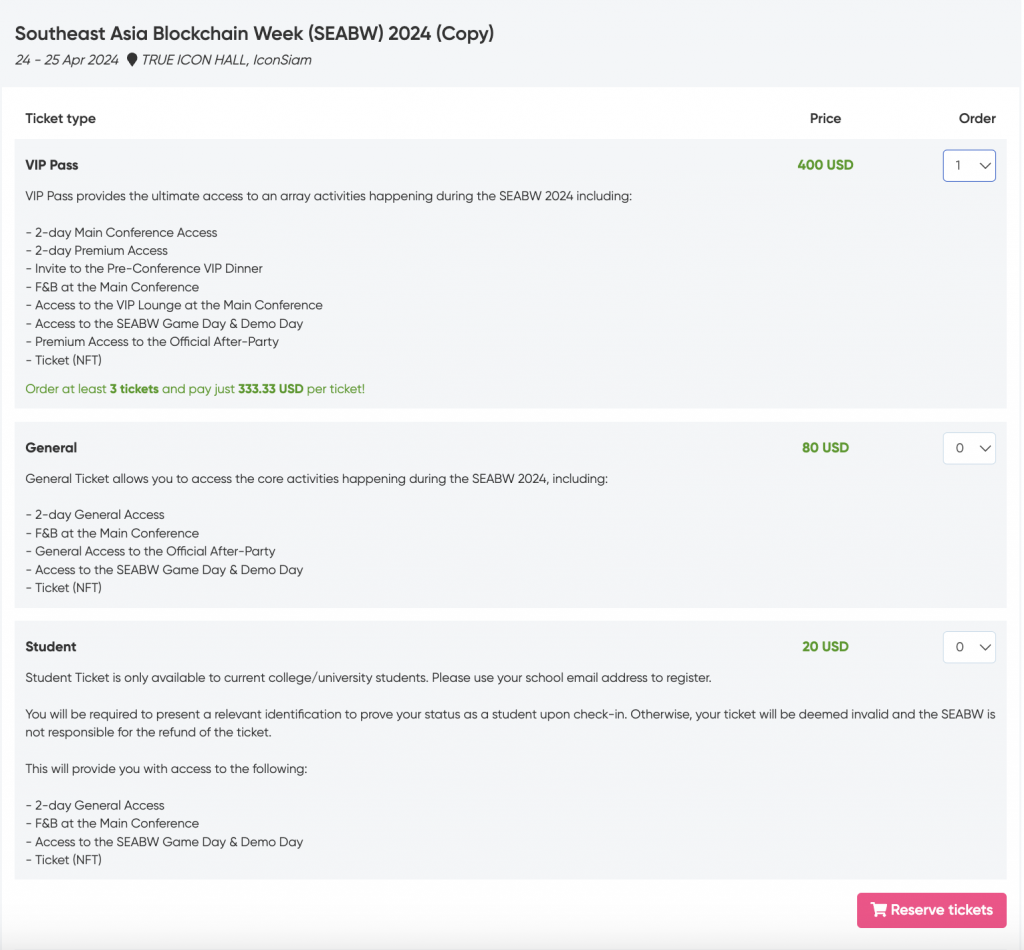
Oveit is the tool that allows you to create your event and sell access to it. In just a few steps you can generate your event, set-up ticket categories, and sell access directly on your website. It has a direct debit feature, meaning that each time a customer places an order, the money will go straight into your account. You just need to connect your payment processor’s account.

print screen from Oveit's Dashboard - ticket categories


Once you create the event it automatically becomes available on Streams.live as well.


Streams.live Dashboard - list of events


From here, after you select the Start option (don’t worry, the stream will not start at that moment) you will see some features destined exclusively for the online experience.


advanced setting for a Streams.live online event


The permalink is the unique URL of your stream – this is the page from which your followers will access your online content. Don’t worry, if a viewer does not have the permalink of your event, they will be redirected on the landing page after the ticket code is entered. 

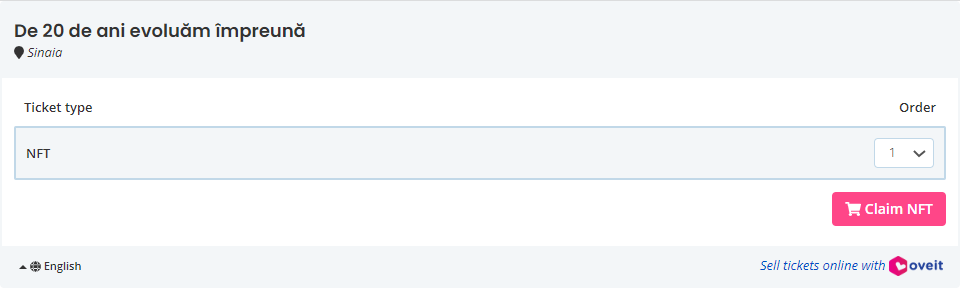
They just need to select the “I have a ticket” option:


Stream.live homepage


and enter the code available on the e-ticket they have received.


cod-bilete


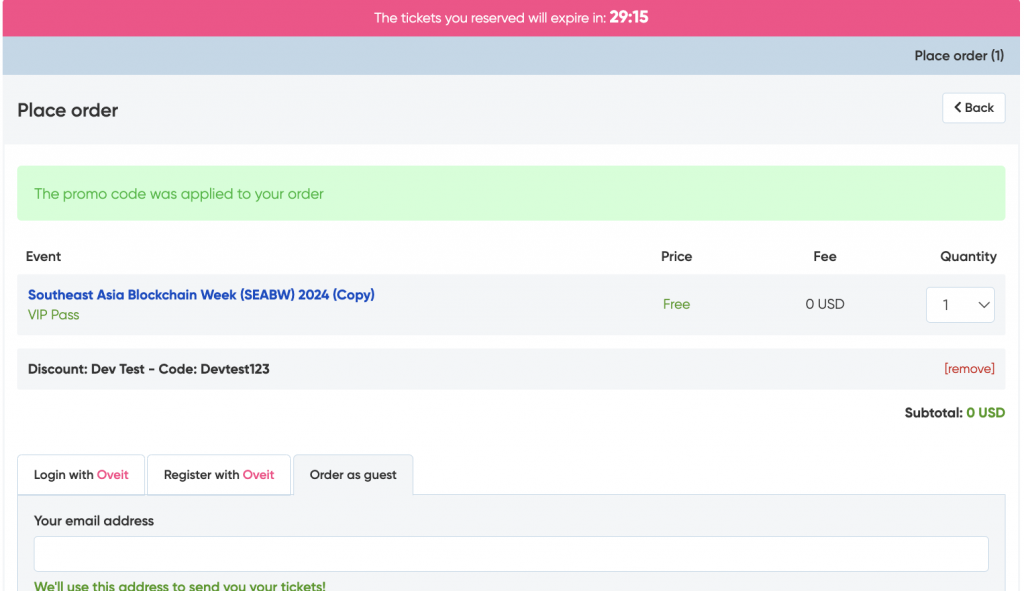
P.s. no worries, if a client lands on your event’s unique URL (stream link) but didn’t buy access yet, they can do it straight from there. By selecting “Buy access” the registration widget will pop up, allowing them to register without leaving the page.


Option to buy tickets available on Streams.live


Streams.live is the platform that delivers the wonderful online experience. 

When you are ready to start broadcasting your work, log in into the platform, and select ‘Start”.

You will use one account for both Oveit and Streams.live

The first step will allow you to activate the chat. 

Select Start (again) for the final settings. Here, you have two options from which you can choose the source of your video. Choose between:


settings available in the Streams.live account - webcam and RTMP


Computer camera – allows you to stream content using the webcam of your device

RTMP – allows you to use a video editing software (read more)


Once you go live, attendees will have the option to chat, ask questions, and purchase products and services* (feature currently in the testing stage).


interactions-streams-live


Want to find out more? Drop us a line.
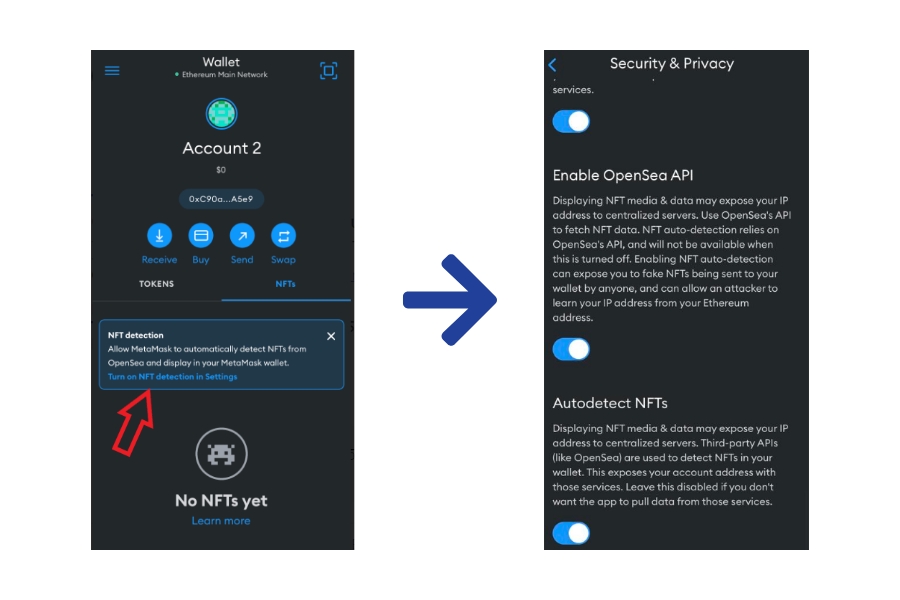
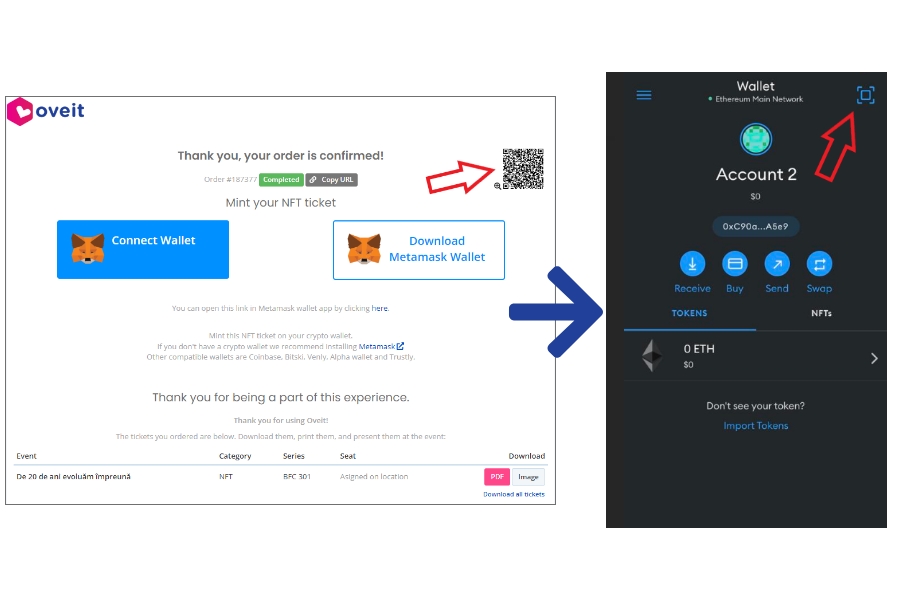
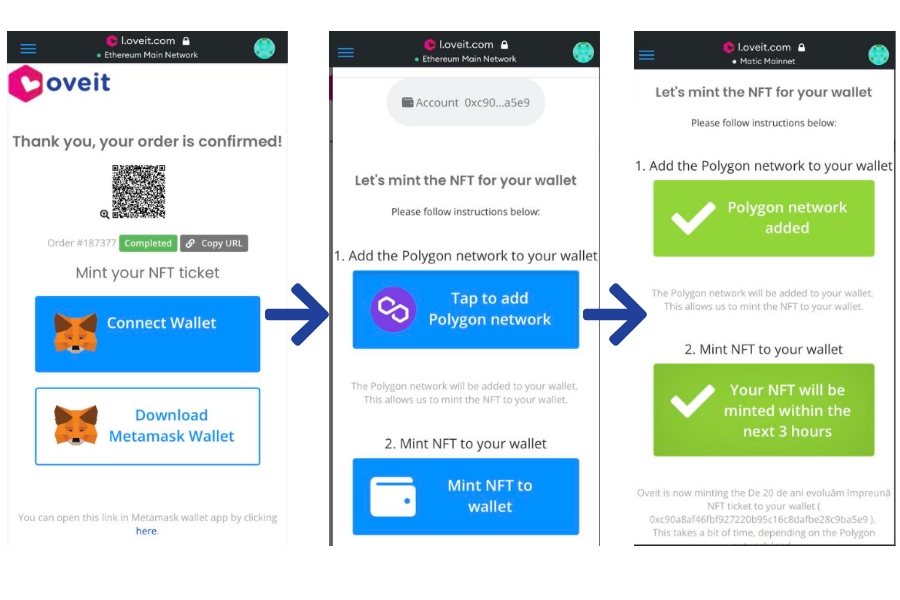
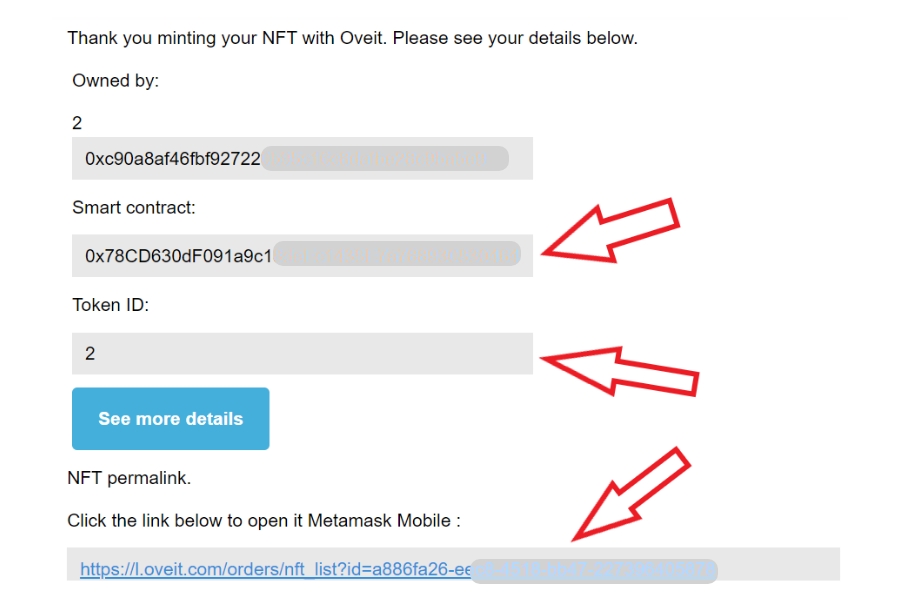
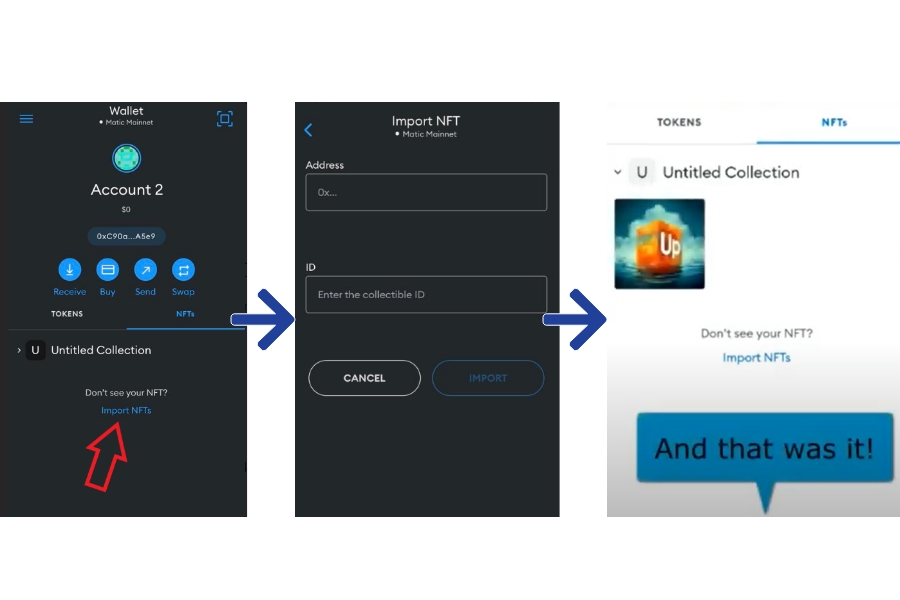