Everything is planned for your event – speakers, schedule, catering, and location. All you have left to do is start registering attendees to your event and this is not an easy task. You have to make your event stand out in the crowd and convince people to spend money on registrations. Therefore, here are some proven tactics to increase your sales, especially when you’re using the right event registration software.
1. Set up your pricing strategy
Before setting a price for your event registration, take time to research what other prices are on the market. Don’t go way over the average price, even if you’re planning for an wonderful event and you have great speakers and a diverse schedule. Also, don’t go too low, because that will position your event as a low quality one. A good idea is to have a high, but affordable price, and offer some discounts, every now and then.
2. Early bird or last minute event registrations
Set a date until attendees can register at a lower cost. This way, you encourage potential attendees to register to your events sooner, so they can receive a better pricing. One other tip is selling last minute registration, at a great cost, but make sure you do this very close to the event. Don’t start the last minute campaign too early, because you will discourage people registering in advance, in the future. A good idea is to sell last minute registrations two or maximum three days prior to your event.
3. Reach out to former attendees
If your event is recurrent a good way to build a strong attendee base is to announce the event to your former attendees. If they attended once in the past and they’ve enjoyed the experience, they are more likely to register again. To increase your chances, you can offer them a discount or a special gift – for example, you can give them free access to a special conference during your event or maybe access to a welcome-drink with the speakers. It’s up to you how you choose to reward them for their loyalty.
4. Ask for help from partners
Ask your partners to promote your event. They don’t have to do anything complicated: Facebook posts are a great way to engage their audience. Imagine that: if you have 10 partners for your events and they all share it on social media, 10 different communities will find out about your event, so your chances of people buying tickets increase greatly.
5. Fuel sales with employee contests
So you plan an event and have a team of, let’s say, 15 people working on this project. Challenge them. You can make a fun contest for the team: each of them can become an event ambassador and help with sales and registrations. The one with the most registrants brought on board will win a prize of your choice: a gym membership, a day at the spa or anything that you know your employees may want – of course, at a reasonable price. Or you can even hand out prizes with low costs: a free day or an work-at-home day, a better desk for the winner, a new chair or a new set of headphones. The point is to make it fun for the team and build up event awareness with the help of the people closest to the planning.
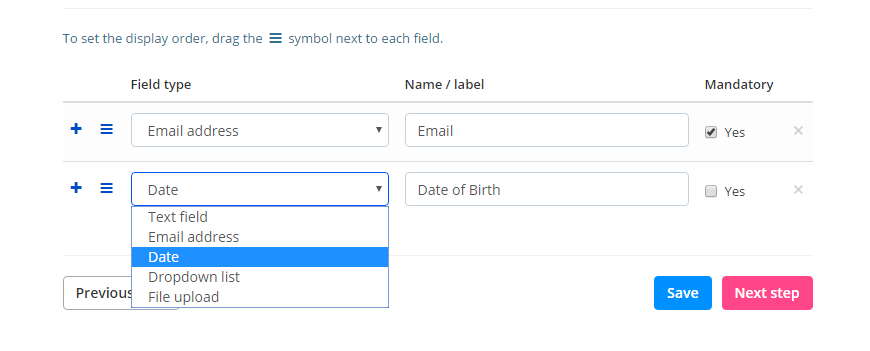
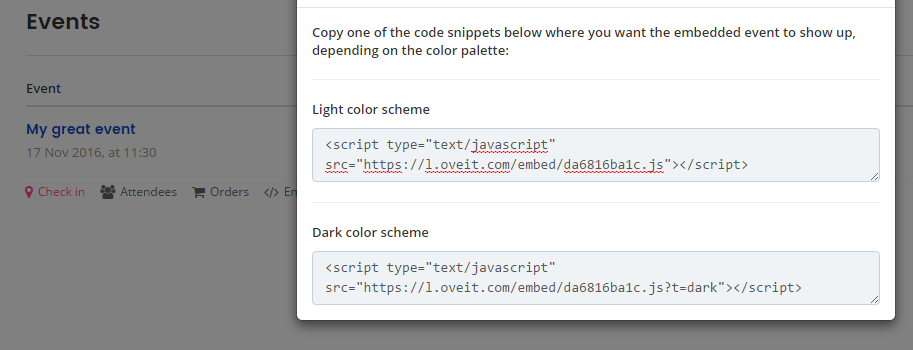
6. Go full digital with the perfect online tool
A good idea for handling registrations is going full digital. Use an online event registration software, such as Oveit. Oveit is a cloud tool that allows event organizers to manage events, registration data, customer relationship and cash flow. Oveit runs embedded on your website and implementation is as easy as copy and paste! You get multiple marketing options and an easy way of handling sales, managing your team and finances.
7. Distribute your message on Social Media
Your social media pages need to be constantly updated. You can post news about your event, live videos showing the preparations and short interviews with the speakers. You can also offer some small (or larger) contests, where you an offer discount for the registrations, or advertise on social media, a good way to target your potential attendees.