How to successfully market an event

Marketing an event is neither innately or self conspicuous; a lot of patience and knowledge is required in order to properly promote it.

-POP

How do you make sure that your consumer keeps bonding with your brand?

Many businesses have the possibility to immerse their consumers in whole physical experiences through their products, promotions, show-rooms, shops, etc.

What about the brands that have no physical product to wow their consumer with, or stay hidden behind a blog and the social media channels. How do they engage with their customers?

The answer is events. The creation of promotional events through which brands can bring awareness and bond with your customers is definitely the success key.

Even knowing how important events are, many businesses don’t take full advantage and fail in delivering a good event. It is impractical to organize a surpassing event and offer top quality products and services if you are failing to promote it. Who will know or attend your event if you don’t sell it properly?

Event marketing is essential in order to attract the right audience

Event marketing is the best opportunity to bring your community together and spread the word. Best of all, the most effective forms of event marketing will get people talking, writing, and reading – all about your brand, products or services.

The best way of understanding your most effective forms of marketing is putting yourself in your attendee’s shoes. So let’s imagine you are your future event’s attendee.

What are the steps you undergo from the moment you hear about the event till you get to participate:

  1. Ways you could find out about the event:
  • A friend – word of mouth
  • A poster/ flyer/ TV/ Radio – Traditional Marketing
  • Social Media/ Email – Digital Marketing

It is important that both Traditional and Digital marketing channels are used properly. Sometimes first impression is the last impression and this is the time you can attract your future attendees with perhaps just a glance of a look.

Depending on the type of your event and audience segmentation you will decide which marketing mix will be appropriate.

With a poster or a flyer your purpose is to create eye-catching print that will attract people to participate in your event and offer the necessary information about it. If you are interested in finding more about how to create an attractive poster here are some tips & tricks how to do that, offered by Venngage.

Email marketing has the same purpose as the print material; catch the eye in a short time frame, inform and redirect to your digital channels.

TV and Radio Advertising are most of the time effective though they are pricey. If you are creating an event for tens of thousands of people big media spending is definitely worth it. Otherwise – maybe stick to something more cost effective.

Social Media is the most effective and affordable slew of tools you can use to market your event

The purpose of Social Media is not only to advertise your event before but also create an online community that will help maintain the interest in your event in between happenings.

It is important to know how to keep your attendees engaged before, during and after your event. According to a study conducted by Buffer in 2014 nearly as many attendees are talking about the events as during the event.

Therefore, it is important to create the excitement before the event, during and after:

Pre-event

The objective is to create excitement of the up-coming event, engagement on the Social Platforms and enroll those who are not decided yet if to participate or not.

How to do that?

  • Through posts that include questions, information, tutorials, etc.
  • Create an unified hashtag to use across all social channels –  even if it doesn’t seem important, using it well in advance to your event and on all Social Platforms can result in a successful tool in order to centralize all of the posts regarding your event
  • Don’t forget to add your hashtag in all your Social Media’s bio – once you have a link to your event, update your Bio section, and then people have a very simple way to find out more
  • Distribute your events on discovery sites across the web in order to reach a more targeted audience
  • Use Facebook, Instagram ads to re-market to prospects – show ads to people who have already visited your website.

During the event

The main objective is to make your attendees talk about and share your event :

  • Engage in live streaming with the peaks of your event
  • Encourage people to check-in, like your Social Media pages and post photos from the event

“In this fast-paced, noisy online world, visual content is the best way to not only capture the attention of fans, but also to have them take action on your content.” – Donna Moritz of Socially Sorted

Post-Event

The target here: keep them coming back next year. It is still important to continue promoting the event but the marketing will come from a place of knowledge and top of mind recognition, rather than having to refresh their memories.

  • Keep engaging with customers and create new possible leads for your future events by posting regularly and keeping the community updated
  • Harness the Power of Visual Testimonials – show the excitement and vibe of your speakers, attendees or the event in general
  • Share and leverage the user generated content since this will bring more authenticity and credibility to your posts.
  • Make use of all content produced during the event and post regularly

  1. When looking up for the event, your search engine will hopefully display the following:
  • Event’s website
  • Discovery sites
  • Social Media Pages

Search engines are making people’s life easier by guiding them in their search. But getting your websites to appear at the top of the search result is no easy thing. Your website needs to have a high ranking in order to be displayed at the top and this is possible only through Search Engine Marketing.

Another important aspect is the reliability of your website because it represents the portal to your event and the first step in your attendees’ immersion. This experience has to be appealing, concise, user friendly, up-to-date and synchronized to all of your pages.

Lastly, don’t forget to create a mobile website too, since many web users are doing their research from their smart phones.

  1.   While doing the research you will be looking to find out:
  • More information about the event
  • Who else from your friends are attending the event
  • Other people’s impressions and reviews

Your attendees are searching for more information because they want to rest assure that your event is what they are looking for. It’s a good opportunity not only to offer them all the information they are seeking but as well connect with them and make them feel part of the community.

Some of the information that you can offer them:

Insides (e.g., special contests during the event, special photo or autograph sessions, sweepstakes etc.)

Details (who else is attending the event, weather, location map, etc.)

Assurance (other people’s testimonials and comments)

  1. Decision time:
  • If happy – attend the event and ask friends to join
  • If not happy – don’t go, and even more, persuade others in not going

At this point your only hope is that your attendees are happy and desire to participate along with their friends and family. The only way to get here is by following the previous steps.

  1. Final step – Register online and buy the ticket
  • If 100% sure + flawless registration = ticket is bought
  • If 100% sure + unfriendly registration = there is a small chance that the ticket will not be bought
  • If 50% sure + unfriendly registration = big chances that the ticket will not be bought

And when you thought that might be all, guess what? – it’s not!

A registration process that it is complicated and slow it’s the worst turn out for your future attendees. The payment process has to be the easiest step from the whole journey.

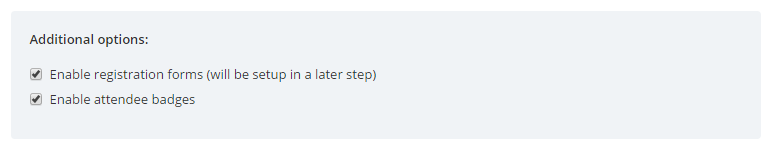
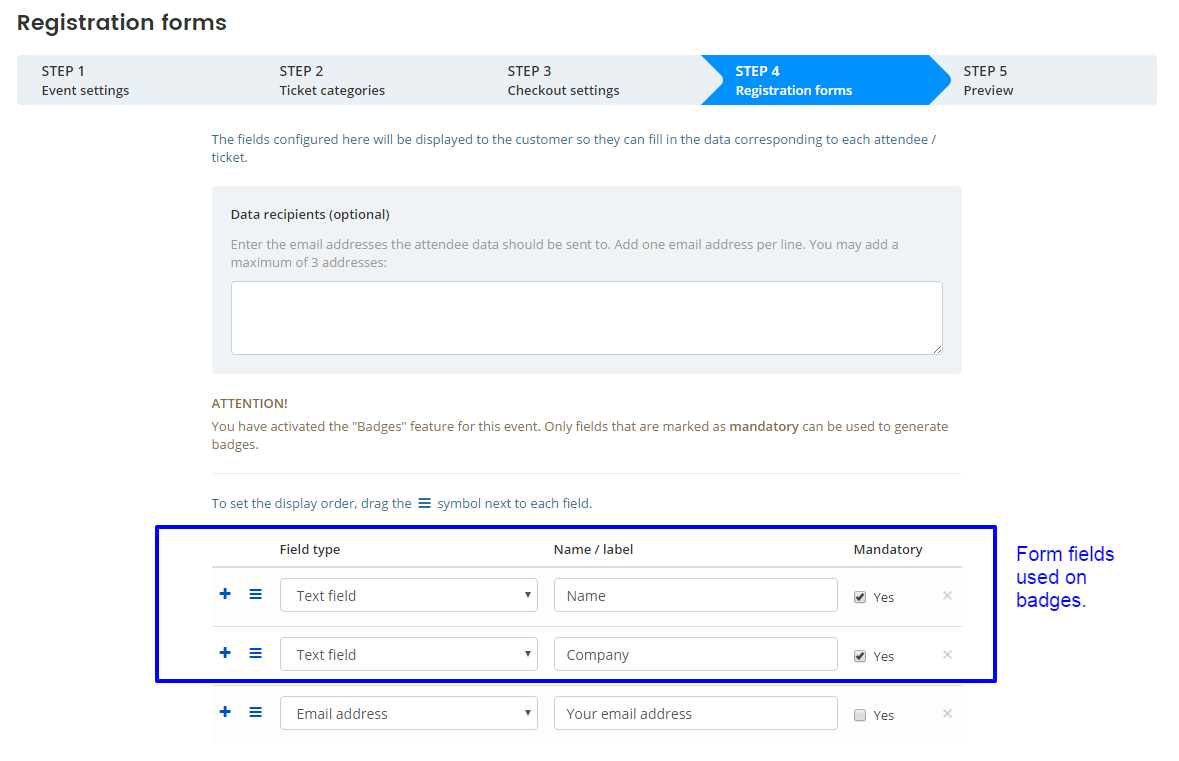
Ticketing and event registration software comes in handy when in need for an efficient payment process. Using our event management and access management platform, Oveit, will not only significantly simplify the payment process but can help you bring more added value to your overall planning, such as:

  • Registration forms enable you to collect data in the form of text (name, company, position) dates (birth date, arrival date), emails, files (PDFs, PPTs, images and more)
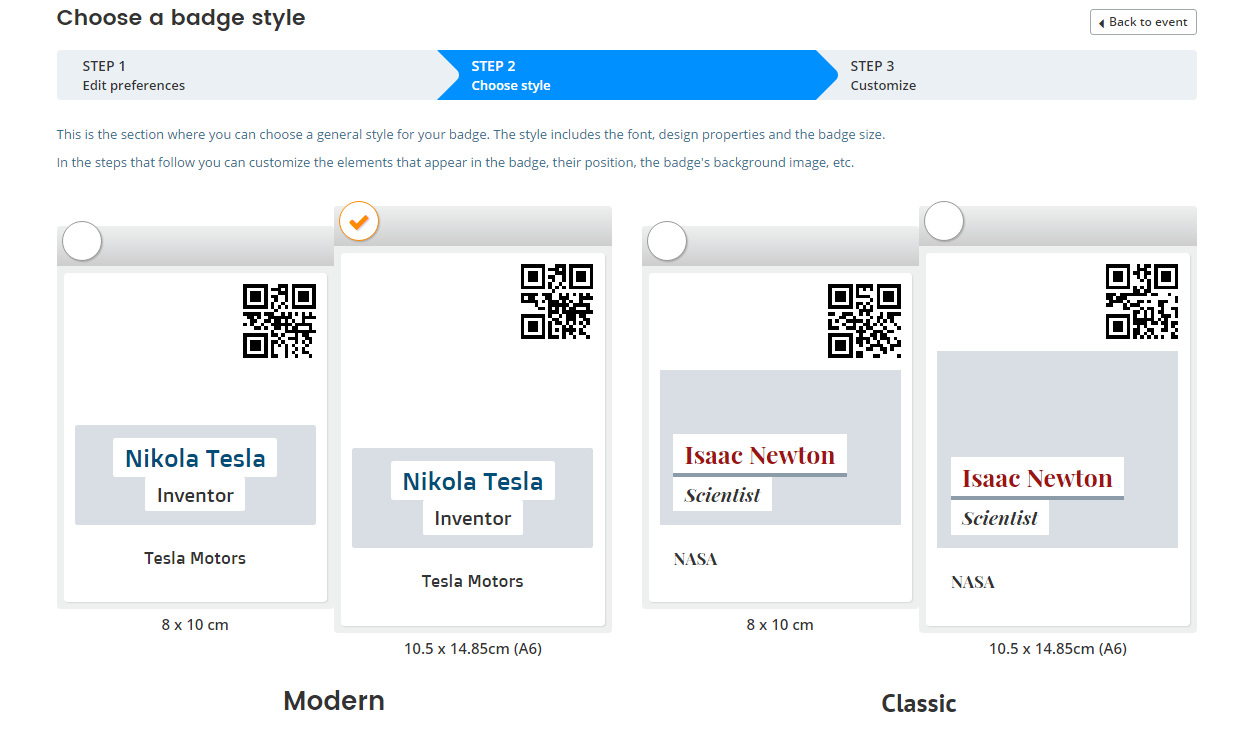
  • Personalized badge design – just use data attendees filled in, drag and drop, add graphics and your personalized badges are ready to send by email or print
  • Mobile apps for ticket scanning, available on iOS and Android.
  • Support for Smart badges, NFC bracelets, access cards, and NFC tickets
  • Seating design for seat-based events

In order to sell tickets and achieve a successful consumer journey, attendees need to be kept engaged at every stage of the process. Providing a memorable pre, live, and post-event experience will make your attendees more connected to your brand and will become, if not already, loyal. Consequently, by trusting you, they will innately recommend and share their experience with others both online but as well direct; word of mouth is still the most valuable marketing tool that has the highest conversion rate.

Why use RFID and NFC technology within an event?

 Because it is simple, new and fun.

Weather you are a marketing agency or an event organizer you will always try your best in order to succeed organizing “the perfect event”.

EXHIBITION(1)

How do you ensure high-octane experiences within your participants and the overall experience?

No matter what kind of event you are hosting, technology is playing an essential role in order to maximize your consumer’s engagement.

The Near Field Communication (NFC) ushered in a new age of technology. This particular innovation, brings an added value to the traditional concept of events, representing the key solution in creating wired experiences.

NFC technology can be used via smartphones and other enabled badges and devices, with amazing benefits for both event hosts and attendees. Basically, it’s a small chip that allows 2 devices to talk to each other when they’re in close proximity.

What does NFC actually do?

Imagine you are attending an event. You booked your ticket online, registered and linked your social media profile to your registration.

When reaching the event you will be handed out a NFC wristband which will offer you instant access, connections, memories and chances to win sweepstakes.

Ticket, wallet and, why not, phone free!

The NFC wristband is uniquely programmed to you and allows you to tap on special designed locations in order to:

  • Purchase drinks and food
  • Check-in and shoot photos that can be automatically posted on your social media page
  • Participate in challenges and win prises
  • Rate  your favorite products or shows
  • Save playlists
  • Check your Geo-location and your friends’

At the end of the event you can access your own memory bank where all your journey is stored. From photos, music playlists, food you’ve liked and many others.

Benefits for Event Planners

  • Faster check in
  • Less Staff needed – diminished costs
  • Reduces queuing time
  • Eliminates ticket fraud incidents
  • Enhance Security
  • Managing permission to specific access areas and lockers
  • Collect information about attendees
  • Consumption
  • Track time spent in different points
  • Ratings of products
  • Inventory of gifts – reducing loses
  • Tailored content – send specific information to particular attendees
  • Gamification features (treasure hunt)
  • Instant survey submission at the end of the event
  • Data and statistics are gathered and shared with the organizers and sponsors for continued interaction with attendees as a tool for future campaigns

Benefits for Attendees

  • Faster check-in (less time spent in line)
  • Cashless wallet: tap & pay
  • Social Media Posting (Photos, Check-ins, Songs)from different interactions
  • Access digital content and information from own smartphones (maps, slides, planning of the event)
  • Vote and rate favorite products
  • Win sweepstakes
  • Interactive challenges to keep the customer engaged
  • Customized wristbands
  • Geo-location (self and friends)

Wristband properties

  • Cost effective
  • Creates interaction
  • High quality print
  • Water resistant and durable
  • Tamper evident closure for maximum security

Integrating  RFID and NFC technology within events is a simple process when using Oveit’s cashless payments solution and can have a significant impact. Knowing who your attendees are and what kind of interaction they are seeking is the most important thing that an event planner has to know. Once you know that, the rest is done by Oveit !

How to Create Personalized Badges for Your Event, in 3 Easy Steps

If you’ve been browsing our blog and went through the articles, you might’ve bumped into one titled “5 Tips for the Perfect Event Badges”. At the end of the article we mentioned a little secret that could help you out with the badge creation for your event. And that secret is, obviously, Oveit. In the following article we’ll be going through the step by step process of creating badges for your event using our Oveit event registration software.

1. Set up your event

The first thing you have to do is set up your event. Here’s a brief tutorial on setting up your event on Oveit. However, setting up badges is related to this part so the first elements that you have to activate are found in the additional options of the first step: Enable registration forms and Enable attendee badges. Mark them both.

Forms help you collect attendee data. This data is afterwards printed on personalized badges.

Forms help you collect attendee data.
This data is afterwards printed on personalized badges.

After you click save, a new tab shows up: Registration forms. Yay!

2. Set up registration forms

registration-forms-activated

Now you can collect data from your attendees.

Here, make sure that you mark as Mandatory all the information fields that you want your attendee to have on his badge (Name, Company, Position in Company etc.).

Here’s how a registration form might look like:

registration-forms-setup

There are two important areas here:

  1. Data recipients, which is optional. Here you can enter up to 3 email addresses that will receive updates when forms are filled in.
  2. The form fields. This is where the magic happens. This is where you actually set up your form. You can choose from text fields, dates, emails and such. But for the purpose of our badge setup tutorial, let’s just focus on “text”. For example I chose two text fields I want my attendees to fill in and shown on their badges: Name and Company.

Save and continue setting up your event. When you go back to your events dashboard you will see that the event has a new button next to “Tickets”. It’s called “Badges”.

new-button

3. Setting up your Badge design

Click on it and you will be taken to the Badge design tool. The first thing you see is a blue message: “You haven’t created any badges for this event.” Time to fix this situation. Click on the “New badge” button located in your top-right corner. This will take you to step 1.

badges

Step 1 – Who receives a badge and how will they be able to download it?

Once you’re at Step 1 you will first have to choose what ticket is associated to the badge. You can opt for a specific ticket (to create a specific badge – such as VIP Badge or Press Badge) or a badge for “All tickets”.

The next thing you have to check is whether you want to deliver the badge automatically to attendees via their email after the ticket order is confirmed. This will work only if you have set up at least one mandatory email field for this event.

If you choose to send the badges via email after order confirmation, you can choose your own Email subject and Email text. It is important that you add the ##download_link## variable to the Email text. That is where your attendees will click to download their badge. So regardless of what you want to communicate to your customer, make sure you add that variable to the text.

Step 2 – Choose your badge style

badges-step-2

Step 2 is the Badge style. You can choose one of the four standard badge sizes and formats. These are generally used for all major events so we’re sure that one of these will suit your needs. Once you chose your style, go to the next step.

Step 3 – Customize the badge design

Step 3 is the last and most important one. Here you actually configure your badge. You will see an image of your badge to the left. To the right you can upload a background that you previously create (this is something created specific for your event).

The maximum file size is 4MB and it should be a jpg, jpeg, png or gif. The background design is your choice: you can add sponsors, details, logos, information, maps of the event, anything that you want to appear on the badge of every participant (or of the specific category of people that have access to this type of badge).

A4-badge-area

Click to download an A6 to A4 badge template

Here is an example: Even though the A6 badge area is the only customizable section, you can add a larger background, of up to the size of an A4 paper (at 300 dpi). Click on the image on the right to get a template which you can use to customize your badge. The general areas are outlined so you can see where the content goes.

You can actually print an A4 badge, fold it two times and slip it in a lanyard holder.

Next, you can activate the QR code if you want to scan attendees by their badges. You can move the QR code to the left or right of the badge, as you prefer it (you can also make A4 badges, where only the upper left part will be editable, the rest is your design and when someone receives it, the badge can be folded and placed into the plastic pocket he usually receives at the events’ registration desk).

Drag and drop form fields to show on the badge. Activate and move around the QR code to fit your needs.

Drag and drop form fields to show on the badge.
Activate and move around the QR code to fit your needs.

Finally, you will have a list of the Mandatory fields that you previously created in the Registration Forms step. Here you can drag whatever field you want on the badge and arrange it any way you want. Once you’re done with this, Save your badge and that’s it! You’re done! Simple as that. In less than 5 minutes you can create a badge that will be available for everyone who registers (or buys tickets) at your event. Now all those long hours spending time to create special badges for every attendee are gone.

Of course, if you want to create more badges just repeat the process I’ve just described and you can have as many badge types as your event needs. The attendee has several options now: He can print his badge at home and come with it to the event or someone from your staff can print the badge when the attendee comes to the event. That is simple as well.

Just go to the Events dashboard, click on the “Check – in” button and you will be able to search and find the attendee by typing his name or other form details.

print-badge

Once you find him, you can click on the Print Badge button and that’s it. The badge is printed and your attendee can now enjoy the event.

printing the badge

Hope this was useful. If we can help you further, please let us know.

5 Tips for the Perfect Event Badges

Badges. We all want these small items, because they are our gateway to the event. Backstage passes, VIP badges, press badges or regular entrance badges, we’ve all come across them, regardless of the event. Small and sometimes unnoticeable, badges are one of the most important elements that can make an event good or bad. And while a nice badge will make your attendees wear it with pride and keep it as a souvenir, a bad one can also help. It won’t stand out from the crowd but it will do the trick of getting you inside the venue for your event.

youth-badges-event

So, badges are important for events, but can also be a big burden for the organizer. Ever wondered how it feels to manually create 100 badges for your event? Well, if you think it’s a pain… try to think about big events such as ICEEfest (3500+ badges) or even WebSummit (40.000+ badges), all of them personalized and separated in different categories. If you’re an event organizer, you know what we are talking about, but if you are just planning your first event, you are about to embark on a journey that could be easily called “the nightmare of badges”. Of course, there are some tips and tricks on how to overcome it.

So you have your event planned, tickets are sold or you have several attendees registered. Now comes the badge part. Once someone comes to the event venue, he will be welcomed at the access point, where he will have his ticket checked and badge given. How do you make the badge attractive, so that people will wear it and use it during the event?

1. Create one badge to rule them all

When it comes to badges, size does matter J. There are different regular badge sizes but generally, the standard sizes are: 8×10 cm and 10.5 x 14.85cm (A6). Basically you can do it any size you prefer, but it’s easier to follow the standards as usually the badge goes into a plastic pocket and unless you want to create a personalized pocket, you might want to go the traditional way.

2. Information is the key

The badge has a limited space and you might want to select what information goes there. It is essential that it contains the First Name and Last Name of the attendee, preferably in that order. Then you might want to add important information, such as the name of the company that the attendee works for or his position in the company. You can add other information as well, but make sure that the text isn’t cluttered. A badge full of text will become unreadable and that is definitely not its purpose.

3. Designing your event badge

badges-2A white badge is not a good badge – it will probably end up in the garbage bin at the end of the event. Badge design is vital for your event, as it reflects the whole image of the event. Besides the graphic elements that vary from one event to the other, you might want to take into consideration the badges for different categories at the event. The regular attendee badge should be different from the VIP badge or Press badge. Also, a complex event can have different venues and different ticket options, so badges can help your organizing staff determine the identity of any attendee. To do this differentiation you can use various colors or designs. Your call.

4. Adding sponsors to the event badge

Yes, badges are the most attractive elements for the sponsors. Why? Because everyone gets a badge at the event and if your main sponsor is well positioned on the badge, everyone’s eyes will see the company’s logo. The badge “spot” is a precious one so you might want to consider a single sponsor to be positioned on the badge. That way you might get a good sponsorship just because you are playing the badge game correctly.

badge-design-1

With Oveit, badge design is easy and fun

5. Additional badge usage

Depending on your event, the badge might also prove useful for other things as well, not only access. For example, by unfolding the badge you might get the map of the event venue, the event schedule, or both. Thus, the badge can turn into your personal event assistant with just a couple of flips.

As you’ve seen, badges can be a lot of things and can be a useful tool for your event. The most important thing, however, is that the badge can be a mirror of your event. If it’s done in a professional way, then there’s a good chance that your event will be professional. Spend time on your badge design and your event will benefit from it. Guaranteed!

We also have a little secret regarding the time spent to defeat the “badge nightmare”. Time to unravel it: Go to Oveit.com, create an account and you’ll find our Badge design tool. Activate it and you can do thousands of personalized badges with just a couple of clicks. You don’t believe us? Give it a try and you’ll never want to use another badge design tool ever again.